Router Setup
pfSense® WireGuard® Setup Guide
This guide was produced using pfSense v2.5.2.
Set WireGuard Configuration
Install the Package
- Click
System>Package Managerand go toAvailable Packages. - Search for “wire” and install the WireGuard package.
Add a Tunnel
- In your pfSense device, navigate to
VPN>WireGuardand click+ Add Tunnel. - Check
Enabled. - Enter a
Description, like IVPN WG. - Upload the Public key and obtain a client IP address:
- In the
Tunnel Configuration>Interface Keyssection, click theGeneratekey button, copy the Public key, then go to the IVPN Account Area by logging in to the ivpn.net website. - Click the
WireGuardtab in the IVPN Account Area and clickAdd a new key. - Paste the Public key and click the
Addbutton to obtain a 172.x.y.z client IPv4 address and a fd00:4956:504e:ffff::wxyz:wxyz client IPv6 address.
- In the
- Enter the client IP address into
Addressfield. For IPv4 addresses, like 172.x.y.z, choose32from the subnet mask dropdown. For IPv6 addresses, like fd00:4956:504e:ffff::wxyz:wxyz, choose128from the subnet mask dropdown.Note: It is possible to use a "simplified" IPv6 address. Use the IPv6 prefix and add the IPv4 address: fd00:4956:504e:ffff::172.x.y.z. pfSense and other WireGuard clients accept both forms. - Click the
Save Tunnelbutton and click theApply Changesbutton.
Be sure to copy the Public Key and not the Private Key. The Private Key must always be kept a carefully guarded secret.
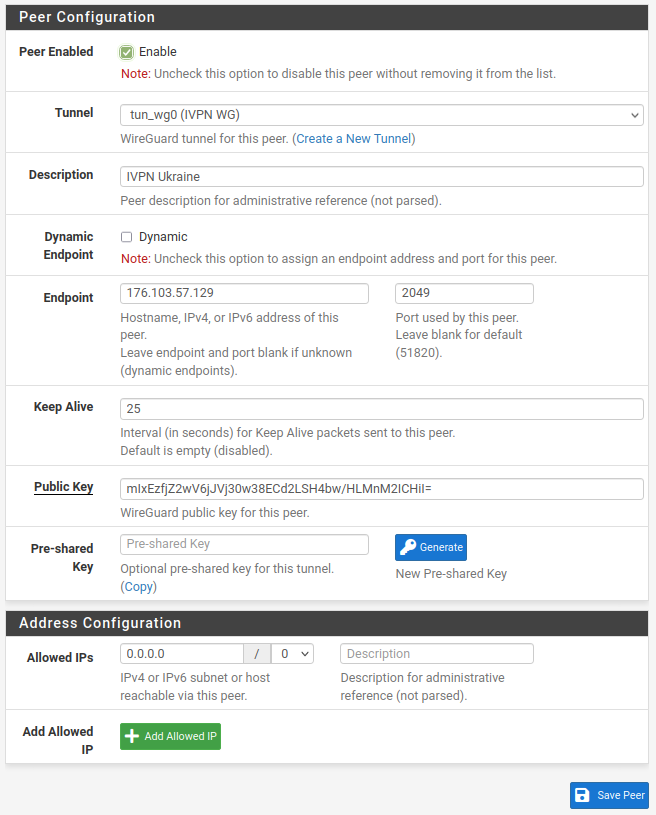
Add a Peer
- On the new tunnel line (tun_wg0), click the
Add Peericon (head and shoulders with a + sign) under the Actions column and enter the following:Description: Describe the VPN server, like IVPN UkraineDynamic Endpoint: Unchecked.Endpoint: IP address or hostname of IVPN’s WireGuard server, hostnames are available on the IVPN server status page
- To turn the hostname for the Ukraine server (ua.wg.ivpn.net) into an IP address (176.103.57.129), for example, run
nslookup ua.wg.ivpn.netin a Command Prompt on Windows or Terminal on macOS or Linux or viaDiagnostics>Command Prompt>Execute Shell Commandin the pfSense web interface:
$ nslookup ua.wg.ivpn.net
…
Name: ua.wg.ivpn.net
Address: 176.103.57.129Endpoint Port: Choose one of 53, 2049, 2050, 30587, 41893, 48574, or 58237, all are equally secureKeep Alive: 25 seconds is reasonablePublic key: IVPN WireGuard server’s key, available on the IVPN server status pageAllowed IPs: For IPv4 addresses, enter 0.0.0.0/0. For IPv6 addresses, enter ::/0
- Click the
Save Peerbutton and click theApply Changesbutton.
Interfaces
- Navigate to
Interfaces>Assignmentsand click the+ Addbutton besideAvailable networks ports: tun_wg0. The interface becomes OPT1 (or another OPT*). - Click the
Savebutton. - Click the
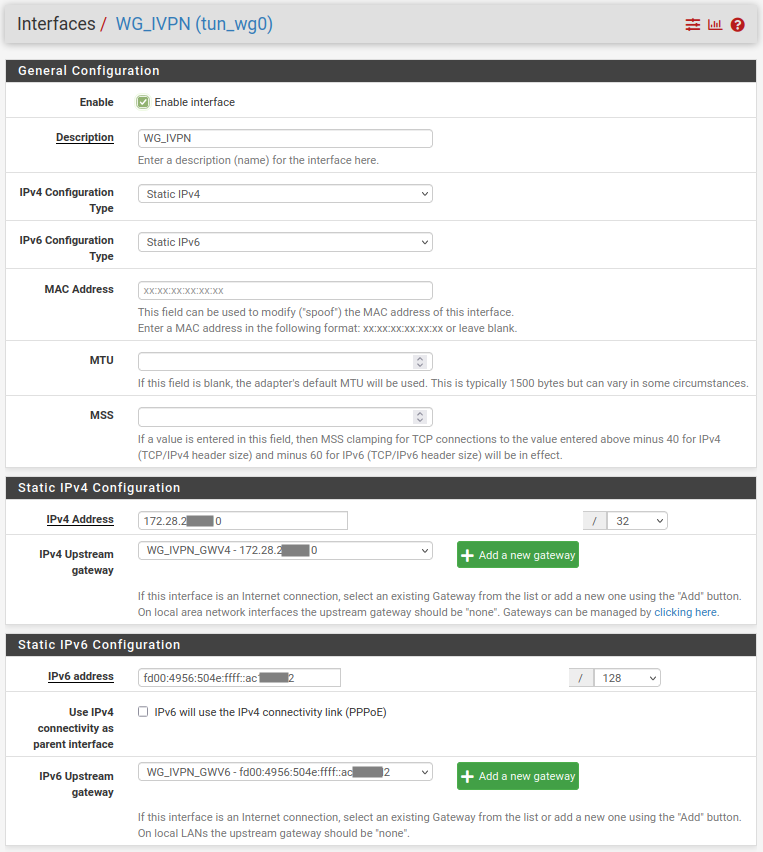
OPT1interface name link and put a check mark besideEnable. - Change the
Descriptionfrom OPT1 to WG_IVPN - IPv4:
- Set
IPv4 Configuration Typeto Static IPv4 - In the
Set IPv4 Configurationsection, set theIPv4 Addressto the same 172.x.y.z IP address that was assigned in the Account Area. The subnet mask is /32 - Beside
IPv4 Upstream Gateway, click the+ Add a new gatewaybutton - Change the
Gateway nameto WG_IVPN_GWV4 - Set
Gateway IPv4to same 172.x.y.z IP address that was assigned in the IVPN website Account Area - Click the
+ Addbutton on the New Gateway popup
- Set
- IPv6:
- Set
IPv6 Configuration Typeto Static IPv6 - In the
Set IPv6 Configurationsection, set theIPv6 Addressto the same fd00:4956:504e:ffff::wxyz:wxyz IP address that was assigned in the Account Area (or use the “simplified” IPv6 address). The subnet mask is /128 - Beside
IPv6 Upstream Gateway, click the+ Add a new gatewaybutton - Change the
Gateway nameto WG_IVPN_GWV6 - Set
Gateway IPv6to same fd00:4956:504e:ffff::wxyz:wxyz IP address that was assigned in the Account Area (or use the “simplified” IPv6 address) - Click the
+ Addbutton on the New Gateway popup
- Set
- Click the
Savebutton and click theApply Changesbutton. - Navigate to
Interfaces>LANand setMSSto 1412 - Click the
Savebutton and click theApply Changesbutton.
Firewall
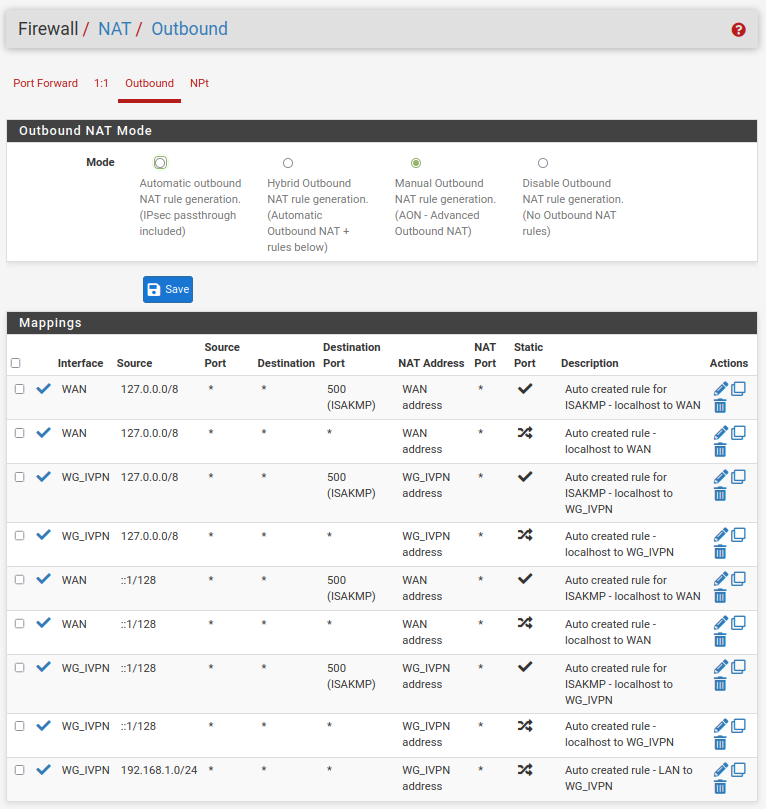
NAT
- Navigate to
Firewall>NAT>Outboundand change the mode to Manual. - Click the
Savebutton and click theApply Changesbutton. - Look for the entry that contains your local network subnet (the one that does not contain port “500” or IP address “127.0.0.0” entries, this might be 192.168.1.0/24) and click on the
Pen icon (Edit mapping). - Change
Interfaceto WG_IVPN and changeDescriptionto mention the VPN, like LAN to IVPN. - Click the
Savebutton and click theApply Changesbutton. - Delete the other rule(s) containing your local network subnet that exist via WAN, (keep the 127.0.0.0). This will ensure that traffic does not leak if the VPN tunnel accidentally goes down.
- Click the
Apply Changesbutton.
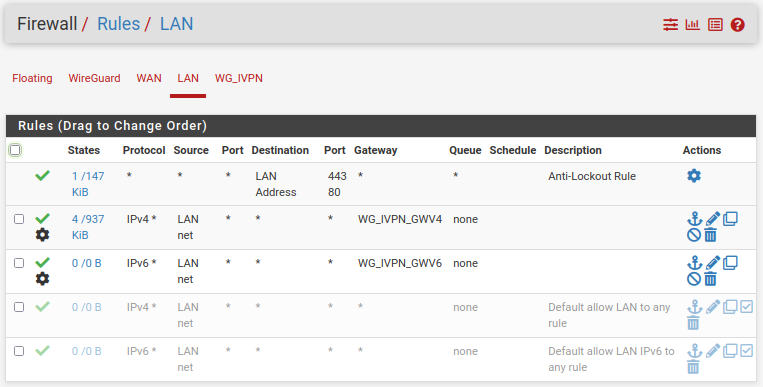
Rules
- Navigate to
Firewall>Rules>LAN, click theAdd (top)button and set the following:Action: PassInterface: LANAddress Family: IPv4Protocol: AnySource: LAN net- Add an optional
Description - Click
Extra Options>Display Advancedand scroll down toGatewayand set it to the WG_IVPN gateway WG_IVPN_GWV4
- Click the
Savebutton and click theApply Changesbutton. - If your LAN includes IPv6, create another firewall rule following step #1 above. Set
Address Familyto IPv6 and setAdvanced>Gatewayto WG_IVPN_GWV6, then clickSaveandApply Changes. - Disable the default WAN access firewall rules on the
Firewall>Rules>LANpage:- Click the green check marks beside the
Default allowrules for IPv4* and IPv6* to turn them off. - Click the
Apply Changesbutton.
- Click the green check marks beside the
Additional Kill Switch Configuration
- Navigate to
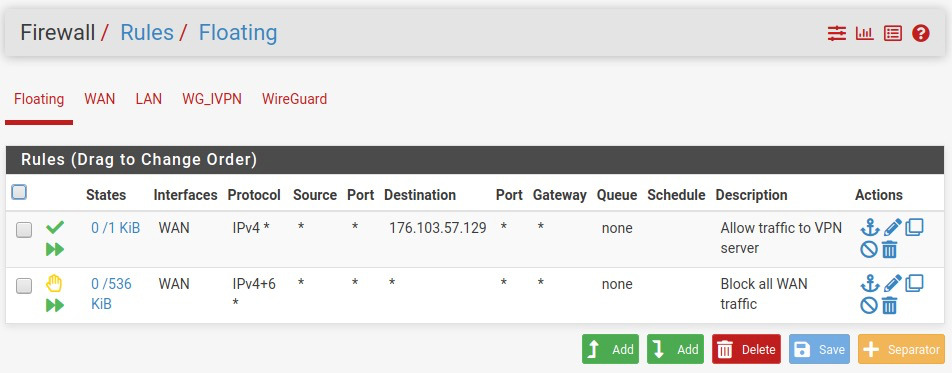
Firewall>Rules>Floating, click on theAddbutton and create the rule to reject all traffic on WAN interface:Action: RejectQuick: CheckInterface: WANDirection: AnyAddress Family: IPv4+IPv6Protocol: AnyDescription: Reject all WAN trafficSave
- Click on the
Add (top)button again and create another rule to allow the traffic from WAN interface to VPN server:Action: PassQuick: CheckInterface: WANDirection: AnyAddress Family: IPv4Protocol: AnyDestination>Single host or alias>176.103.57.129Description: Allow traffic to VPN serverSave
- Ensure that ‘Reject’ rule resides below the ‘Allow’ one, otherwise drag it down manually.
- Click the
Savebutton and click theApply Changesbutton.
Static Routing
- Navigate to
System>Routing>Static routestab. - Click the
Addbutton and configure the routes as follows:Destination network: The IP address of the WireGuard server176.103.57.129Gateway: Your router’sWANgatewayDescription: “WAN to VPN”- Click
Save
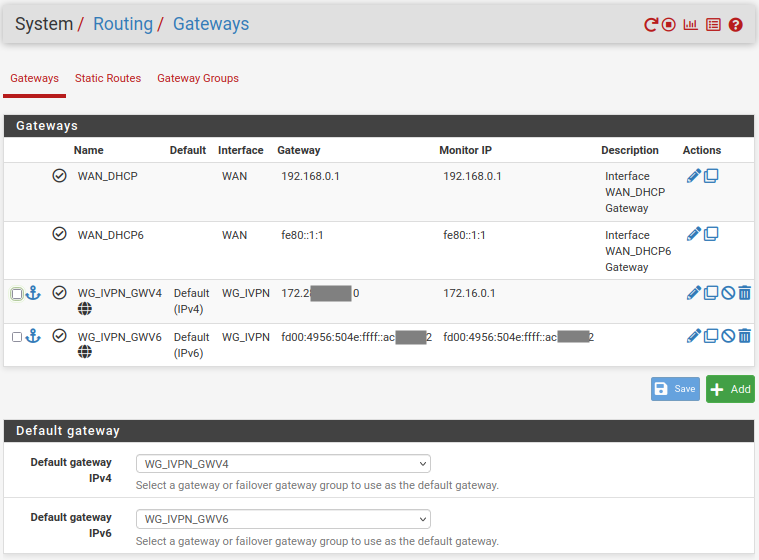
- Navigate to
System>Routing>Gatewaystab and setDefault gateway IPv4to WG_IVPN_GWV4 and setDefault gateway IPv6to WG_IVPN_GWV6. - Click
SaveandApply changes.
DNS
- Navigate to
System>General Setup>DNSand set theDNS Servers>Addressto one of the three internal DNS server options:- 172.16.0.1 = regular DNS with no blocking
- 10.0.254.2 = standard AntiTracker to block advertising and malware domains
- 10.0.254.3 = Hardcore Mode AntiTracker to also block Google and Facebook domains
- Set the
Gatewayto the WG_IVPN gateway WG_IVPN_WGV4 - Uncheck
DNS Server Overrideand click theSavebutton.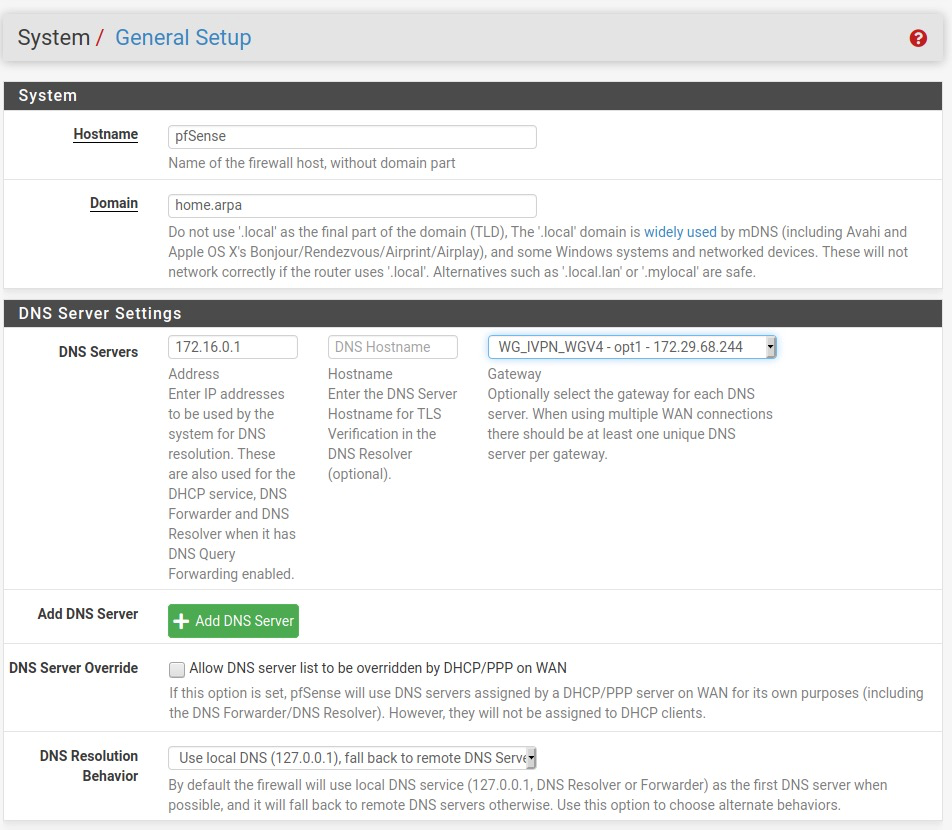
- Navigate to
Services>DHCP Serverand set theDNS Servers>DNS Server 1to the DNS server you chose in step #1 above. - Click
Save.
DNS Resolver
- Navigate to
Services>DNS Resolverand haveEnable DNSSECchecked. - Check
Enable Forwarding ModebesideDNS Query Forwarding. - Click the
Savebutton and click theApply Changesbutton.
Final Steps
- A device reboot is not required, though it may be useful to confirm that everything behaves as expected.
- Run a leak test at https://www.dnsleaktest.com via one of the internal network clients attached to your pfSense router.
- Use
curlon the pfSense router to confirm the router’s traffic uses the VPN connection:- Go to
Diagnostics>Command Prompt. - For IPv4, enter
curl -4 ifconfig.coin theExecute Shell Commandbox, then pressExecute. - For IPv6, enter
curl -6 ifconfig.coin theExecute Shell Commandbox, then pressExecute. - In both cases, the IP address on the last line of the shell output is the VPN server.
- Go to
Please note: If you plan to use a Multi-hop setup please see this guide and make the required changes to the Endpoint Address port and Peer Public Key.