Router Setup
pfSense® OpenVPN Setup Guide
Basic pfSense Setup
-
Add the CA.crt to the Certificate Manager
In your pfSense device click onSystem->Certificates->Authoritiesand then click on+Add.Give it a name, i.e. “IVPN CA”.
Choose
Import an existing Certificate Authorityand paste the following under “Certificate data”:-----BEGIN CERTIFICATE----- MIIGoDCCBIigAwIBAgIJAJjvUclXmxtnMA0GCSqGSIb3DQEBCwUAMIGMMQswCQYD VQQGEwJDSDEPMA0GA1UECAwGWnVyaWNoMQ8wDQYDVQQHDAZadXJpY2gxETAPBgNV BAoMCElWUE4ubmV0MQ0wCwYDVQQLDARJVlBOMRgwFgYDVQQDDA9JVlBOIFJvb3Qg Q0EgdjIxHzAdBgkqhkiG9w0BCQEWEHN1cHBvcnRAaXZwbi5uZXQwHhcNMjAwMjI2 MTA1MjI5WhcNNDAwMjIxMTA1MjI5WjCBjDELMAkGA1UEBhMCQ0gxDzANBgNVBAgM Blp1cmljaDEPMA0GA1UEBwwGWnVyaWNoMREwDwYDVQQKDAhJVlBOLm5ldDENMAsG A1UECwwESVZQTjEYMBYGA1UEAwwPSVZQTiBSb290IENBIHYyMR8wHQYJKoZIhvcN AQkBFhBzdXBwb3J0QGl2cG4ubmV0MIICIjANBgkqhkiG9w0BAQEFAAOCAg8AMIIC CgKCAgEAxHVeaQN3nYCLnGoEg6cY44AExbQ3W6XGKYwC9vI+HJbb1o0tAv56ryvc 6eS6BdG5q9M8fHaHEE/jw9rtznioiXPwIEmqMqFPA9k1oRIQTGX73m+zHGtRpt9P 4tGYhkvbqnN0OGI0H+j9R6cwKi7KpWIoTVibtyI7uuwgzC2nvDzVkLi63uvnCKRX cGy3VWC06uWFbqI9+QDrHHgdJA1F0wRfg0Iac7TE75yXItBMvNLbdZpge9SmplYW FQ2rVPG+n75KepJ+KW7PYfTP4Mh3R8A7h3/WRm03o3spf2aYw71t44voZ6agvslv wqGyczDytsLUny0U2zR7/mfEAyVbL8jqcWr2Df0m3TA0WxwdWvA51/RflVk9G96L ncUkoxuBT56QSMtdjbMSqRgLfz1iPsglQEaCzUSqHfQExvONhXtNgy+Pr2+wGrEu SlLMee7aUEMTFEX/vHPZanCrUVYf5Vs8vDOirZjQSHJfgZfwj3nL5VLtIq6ekDhS AdrqCTILP3V2HbgdZGWPVQxl4YmQPKo0IJpse5Kb6TF2o0i90KhORcKg7qZA40sE bYLEwqTM7VBs1FahTXsOPAoMa7xZWV1TnigF5pdVS1l51dy5S8L4ErHFEnAp242B DuTClSLVnWDdofW0EZ0OkK7V9zKyVl75dlBgxMIS0y5MsK7IWicCAwEAAaOCAQEw gf4wHQYDVR0OBBYEFHUDcMOMo35yg2A/v0uYfkDE11CXMIHBBgNVHSMEgbkwgbaA FHUDcMOMo35yg2A/v0uYfkDE11CXoYGSpIGPMIGMMQswCQYDVQQGEwJDSDEPMA0G A1UECAwGWnVyaWNoMQ8wDQYDVQQHDAZadXJpY2gxETAPBgNVBAoMCElWUE4ubmV0 MQ0wCwYDVQQLDARJVlBOMRgwFgYDVQQDDA9JVlBOIFJvb3QgQ0EgdjIxHzAdBgkq hkiG9w0BCQEWEHN1cHBvcnRAaXZwbi5uZXSCCQCY71HJV5sbZzAMBgNVHRMEBTAD AQH/MAsGA1UdDwQEAwIBBjANBgkqhkiG9w0BAQsFAAOCAgEAABAjRMJy+mXFLezA Z8iUgxOjNtSqkCv1aU78K1XkYUzbwNNrSIVGKfP9cqOEiComXY6nniws7QEV2IWi lcdPKm0x57recrr9TExGGOTVGB/WdmsFfn0g/HgmxNvXypzG3qulBk4qQTymICds l9vIPb1l9FSjKw1KgUVuCPaYq7xiXbZ/kZdZX49xeKtoDBrXKKhXVYoWus/S+k2I S8iCxvcp599y7LQJg5DOGlbaxFhsW4R+kfGOaegyhPvpaznguv02i7NLd99XqJhp v2jTUF5F3T23Z4KkL/wTo4zxz09DKOlELrE4ai++ilCt/mXWECXNOSNXzgszpe6W As0h9R++sH+AzJyhBfIGgPUTxHHHvxBVLj3k6VCgF7mRP2Y+rTWa6d8AGI2+Raey V9DVVH9UeSoU0Hv2JHiZL6dRERnyg8dyzKeTCke8poLIjXF+gyvI+22/xsL8jcNH i9Kji3Vpc3i0Mxzx3gu2N+PL71CwJilgqBgxj0firr3k8sFcWVSGos6RJ3IvFvTh xYx0p255WrWM01fR9TktPYEfjDT9qpIJ8OrGlNOhWhYj+a45qibXDpaDdb/uBEmf 2sSXNifjSeUyqu6cKfZvMqB7pS3l/AhuAOTT80E4sXLEoDxkFD4C78swZ8wyWRKw sWGIGABGAHwXEAoDiZ/jjFrEZT0= -----END CERTIFICATE-----Click
Save.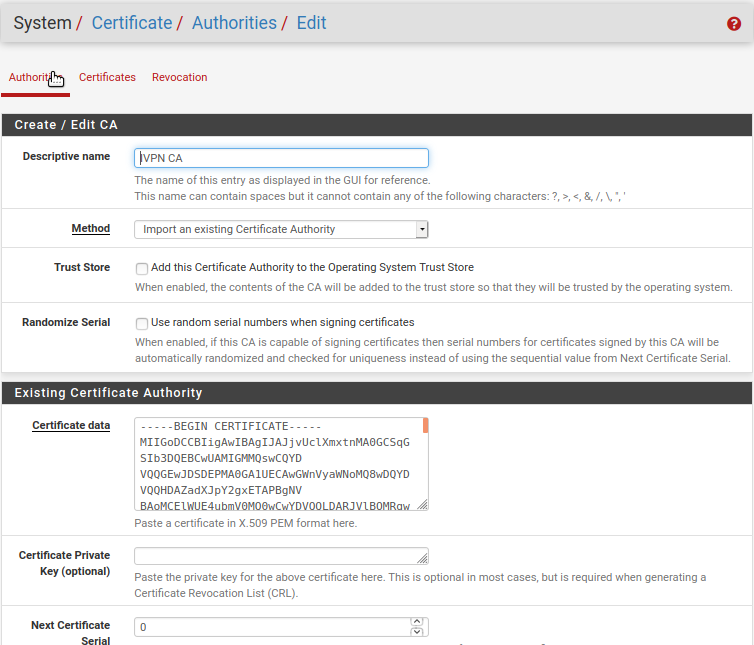
-
Add a VPN connection
In this example, we will create the VPN connection to Canada server (CA.GW.IVPN.NET). You can find domain names of other locations on our server status page.Click on
VPN->OpenVPN->Clients->+Addand enter the following configuration:-
Description - IVPN Canada
-
Server Mode - Peer to Peer (SSL/TLS)
-
Device mode - tun Layer 3 Tunnel Mode
-
Protocol - UDP on IPv4 only
-
Interface - WAN
-
Server host - convert hostname
ca.gw.ivpn.netto an IP address by usingnslookup ca.gw.ivpn.netin a Command Prompt or Terminal -
Server port - 1194 (or any port from the list)

-
Under User Authentication Settings, use your IVPN Account ID for authentication (like
ivpnXXXXXXXXori-XXXX-XXXX-XXXX, case-sensitive). Set the password field to anything non-blank (ie. ivpn or i). -
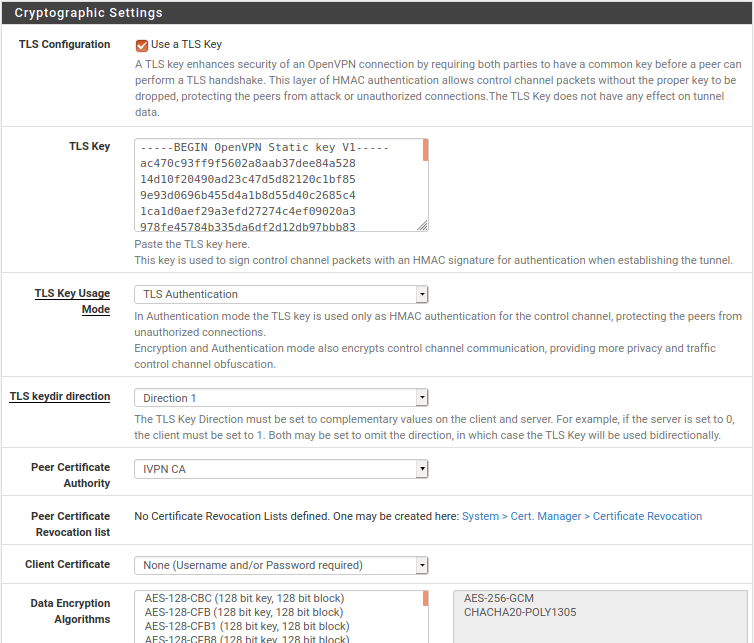
Check Use a TLS Key option under TLS Configuration -> uncheck the Automatically generate a TLS Key option and past the following and past the following under TLS Key
-----BEGIN OpenVPN Static key V1----- ac470c93ff9f5602a8aab37dee84a528 14d10f20490ad23c47d5d82120c1bf85 9e93d0696b455d4a1b8d55d40c2685c4 1ca1d0aef29a3efd27274c4ef09020a3 978fe45784b335da6df2d12db97bbb83 8416515f2a96f04715fd28949c6fe296 a925cfada3f8b8928ed7fc963c156327 2f5cf46e5e1d9c845d7703ca881497b7 e6564a9d1dea9358adffd435295479f4 7d5298fabf5359613ff5992cb57ff081 a04dfb81a26513a6b44a9b5490ad265f 8a02384832a59cc3e075ad545461060b 7bcab49bac815163cb80983dd51d5b1f d76170ffd904d8291071e96efc3fb777 856c717b148d08a510f5687b8a8285dc ffe737b98916dd15ef6235dee4266d3b -----END OpenVPN Static key V1----- -
TLS Key Usage Mode - TLS Authentication
-
TLS keydir direction - Direction 1
-
Peer Certificate Authority - IVPN CA
-
Client Certificate - None (Username or Password required)
-
Data Encryption Algorithm - AES-256-GCM, CHACHA20-POLY1305
-
Fallback Data Encryption Algorithm - AES-256-CBC
-
Auth digest algorithm - SHA1 (160-bit)
-
Server Certificate Key Usage Validation - Enforce key usage
-
Allow Compression - Refuse any non-stub compression (Most secure)
-
Custom options -
verify-x509-name ca name-prefix(middle entrycaneeds to match the prefix for the VPN server hostname) -
UDP Fast I/O - checked.
-
Gateway creation - IPv4 only
-
Click
Save.
-
-
Add an interface
- Click on
Interfaces->Assignments. - Use the Drop-down menu for the
Available network portsand selectovpnc* (IVPN Canada)and click+Add - Click on the new interface name (it is usually named
OPT1orOPT2) and check the Enable Interface option. - Click
Save/Apply. - OPTIONAL: Disable IPv6 via
Interface->WAN->IPv6 Configuration Type= None, then clickSave/Apply.
- Click on
-
Adjust NAT rules
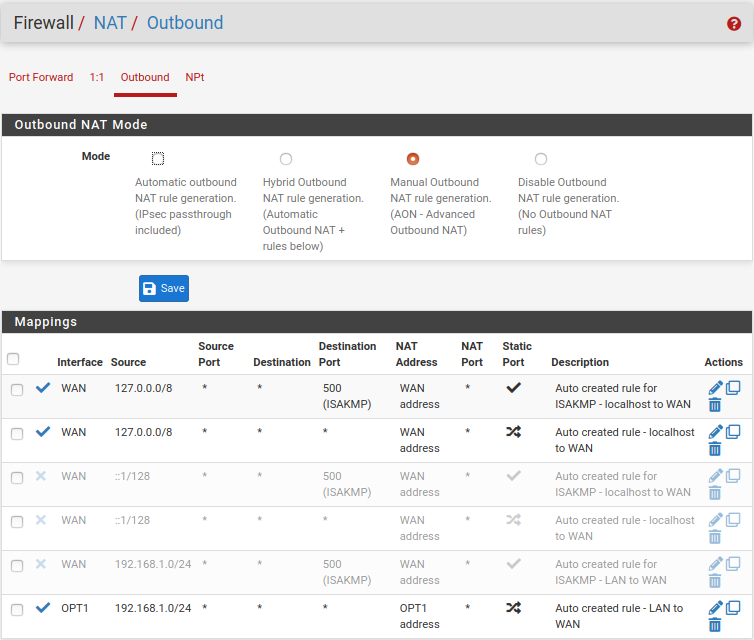
- Click on
Firewall->NAT->Outbound. SetModetoManual Outbound NAT rule Generation (AON)and clickSave/Apply - Look for the entry that contains your local IP address (the one that does not contain port
500nor127.0.0.0entries, for you this will probably be192.168.1.0/24) and click on thePen icon (Edit mapping) - Set the interface to the one created in step 3, write a description and have both Disabled and Do not NAT options Unchecked. Click on the
Save/Applybutton - Delete or disable other rules that contain your local IP that exist via WAN, (keep the 127.0.0.0 ones). This will ensure that traffic doesn’t leak if the VPN tunnel accidentally goes down.
- Click
Save/Apply.
- Click on
-
Configure DNS
- Navigate to
System->General Setup - Add an internal OpenVPN DNS server address, like
10.0.254.1for regular DNS or use an AntiTracker address, and set Gateway toOPT1. - Click the
+Add DNS Serverto add a public DNS server, like our public, validating, non-logging, recursive DNS server at198.245.51.147, and set Gateway toWAN. - Uncheck the box for DNS Server Override.
- Click
Save.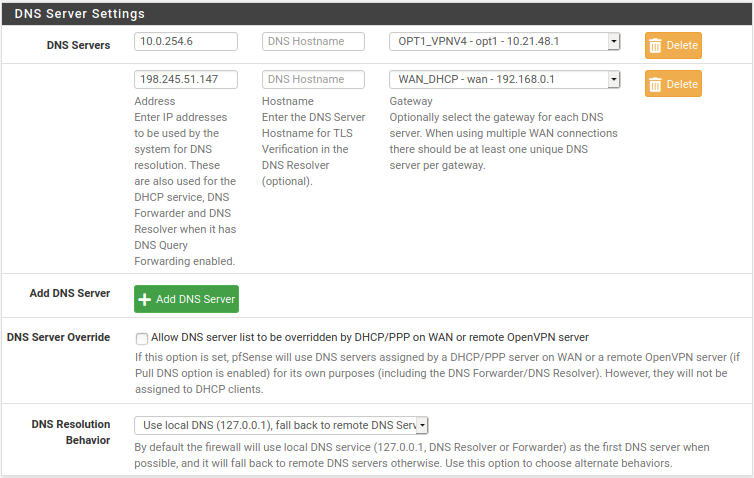
- Reboot the pfSense router to apply the new configuration, then reboot your local network clients.
- Open dnsleaktest.com and run a leak test to verify that you are connected to IVPN.
- Navigate to
Please note: If you plan to use a Multi-hop setup please see this guide and replace the port number in Step 2 with the chosen Exit-hop server Multi-hop port and the verify-x509-name prefix in the OpenVPN client Custom options area matches the exit server.
Privacy Considerations
Recent versions of pfSense send an NTP request to a Google server as part of the system bootstrap process. There are choices with respect to how to handle this:
- Ignore it and accept that a Google server will see your real IP address each time your router boots.
- Create the
/conf/ntp-boot-time-serversfile and leave it empty, which skips the NTP synchronization. - Create the
/conf/ntp-boot-time-serversfile and add one or more NTP server IP addresses of your choice (separated by a single space).
To create the empty file, access the router’s shell and type touch /conf/ntp-boot-time-servers.
To populate the file with one address, type echo a.b.c.d > /conf/ntp-boot-time-servers, where a.b.c.d is an NTP server IP address of your choice.
To remove the file, type rm -i /conf/ntp-boot-time-servers.