Router Setup
DD-WRT WireGuard Setup Guide
This guide was produced using DD-WRT v46772.
Configuring the VPN tunnel
-
Navigate to the home page of your router - By default
192.168.1.1. -
Go to
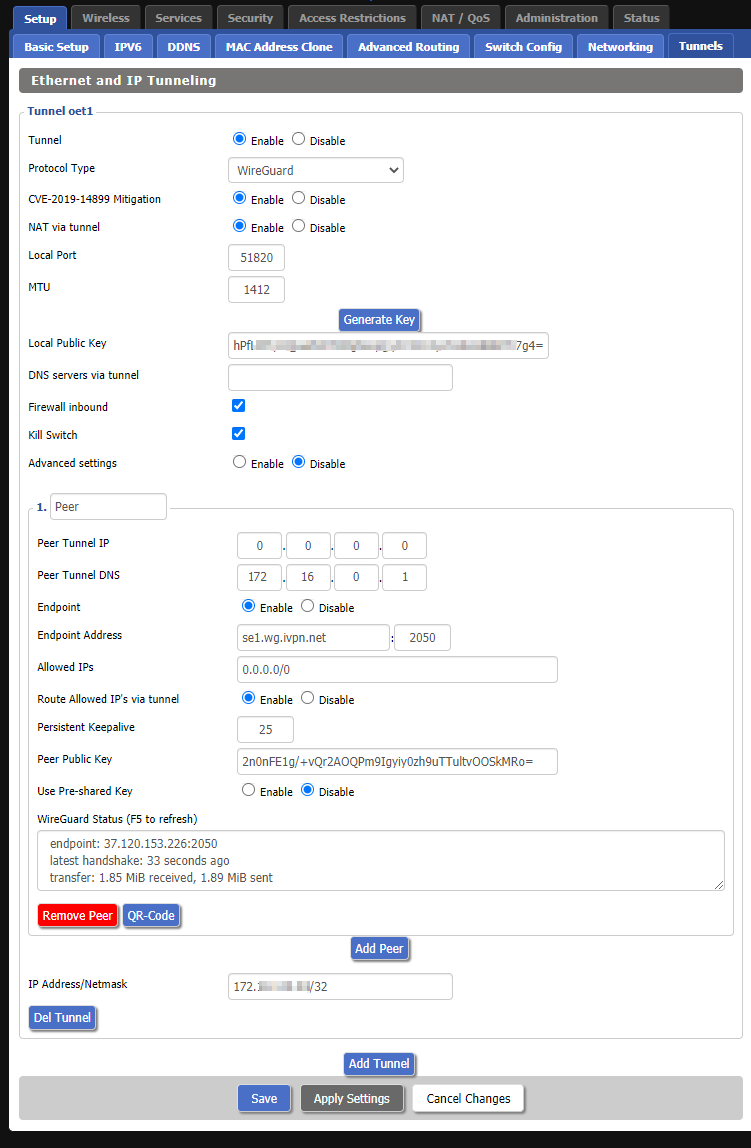
Setup>Tunnels> and click theAdd Tunnelbutton. Choose Enable and select WireGuard from the dropdown menu. -
Set the
MTUvalue of the WireGuard tunnel to1412. -
Click the
Generate Keybutton and go to theClient Areaon the IVPN website to add the generated public key to theKey Managementarea. Make note of the IPv4 address we assign to your public key and add it to the IP address field followed by a/32subnet mask.Hint: After clickingGenerate Key, it may or may not be possible to copy the public key displayed on theTunnelspage. Click theSaveandApply Settingsbuttons, then go toAdministration>Commandsand enter wg in theCommandsbox, then clickRun Commands. This will display details of the WireGuard connection including the public key, which can be easily copied.

-
Set
Kill SwitchtoEnable. This will prevent out-bound traffic when the VPN client is disconnected from the server. -
Click the
Add Peerbutton and enter the following peer configuration (as also shown in the screen shot below):- Peer Tunnel IP: 0.0.0.0
- Peer Tunnel DNS: Specify one of the following DNS servers:
- 172.16.0.1 = redular DNS with no blocking
- 10.0.254.2 = standard AntiTracker to block advertising and malware domains
- 10.0.254.3 = AntiTracker Hardcore Mode to also block Google and Facebook
- Endpoint: Enable
- Endpoint Address: Enter an IVPN WireGuard server hostname (available on the Server Status page) and choose a port:
udp 53 udp 80 udp 443 udp 1194 udp 2049 udp 2050 udp 30587 udp 41893 udp 48574 udp 58237 - Allowed IPs: 0.0.0.0/0
- Route Allowed IP’s via tunnel: Enable
- Persistent Keepalive: 25
- Peer Public Key: Enter an IVPN WireGuard server public key (available on the Server Status page)
- Use Pre-shared Key: Disable
 Note: You are welcome to use whichever server you prefer. The Endpoint Address and Peer Public Key in the example above are specific to our server in Sweden.
 -
Click the
Savebutton, then click theApply Settingsbutton.
DNS
-
Navigate to
Setup>Basic Setup. -
Specify one of the following DNS servers in the
Static DNS 1field:- 172.16.0.1 = redular DNS with no blocking
- 10.0.254.2 = standard AntiTracker to block advertising and malware domains
- 10.0.254.3 = AntiTracker Hardcore Mode to also block Google and Facebook
..and 198.245.51.147 in the
Static DNS 2field. -
Click
Save&Apply Settings.
Final steps
-
Reboot your router and wait for a minute or two for everything to settle, then reboot your computer system.
-
Check the assigned public IP address on our website and run a leak test at https://www.dnsleaktest.com from one of the devices connected to your DD-WRT router.
Please note: If you plan to use a Multi-hop setup please see this guide and make the required adjustments to the port in the Endpoint Address & public key in the Peer Public Key fields.