Router Setup
DD-WRT OpenVPN Manual Setup Guide
-
Navigate to the home page of your router - By default
192.168.1.1. -
Click on the
Servicestab. You may be asked to enter your router username and password. -
Click on the
VPNtab and then click on theStart OpenVPN Clientbutton. -
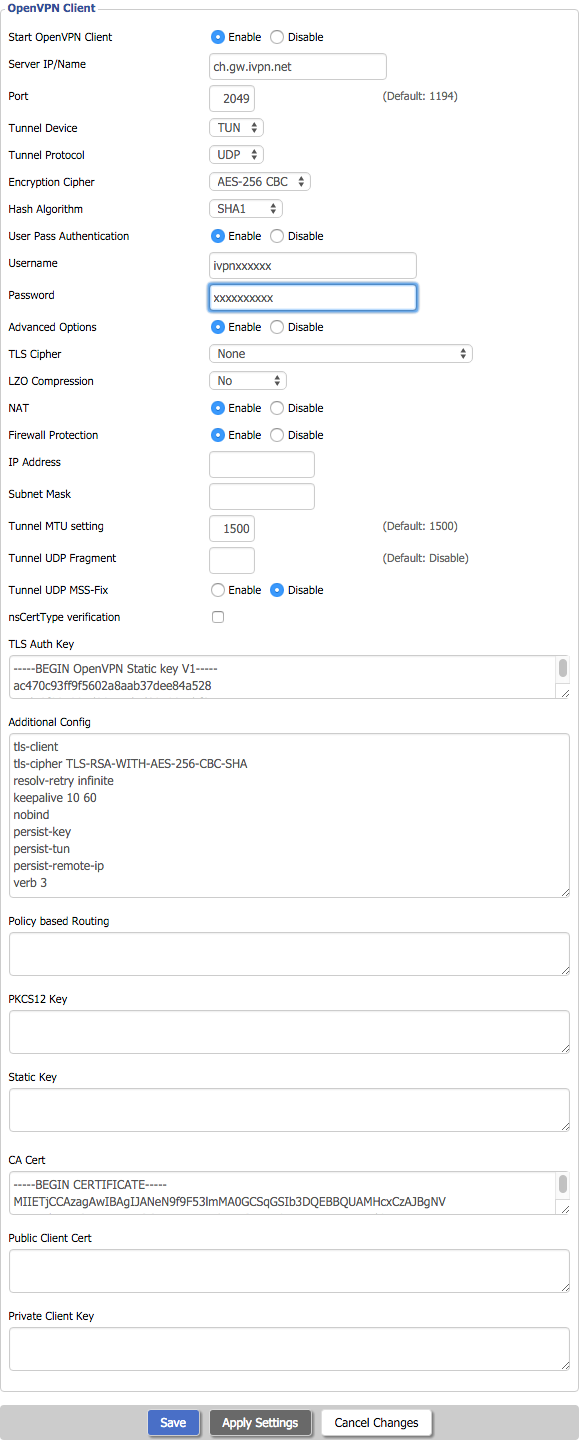
Enter the following configuration (as also shown in the screen shot below):
Where we do not specify a value leave the default value in place.- Server IP/Name: Enter a server name from the server status page e.g. ch.gw.ivpn.net
- Port: 2049
- Tunnel Device: TUN
- Tunnel Protocol: UDP
You can also use ports UDP: 53, 80, 443, 1194, 2050 & TCP: 80, 443, 1443-
Encryption cipher: AES-256 CBC
-
Hash Algorithm: SHA1
-
User Pass Authentication: Enable (If this option does not exist you will need to follow the steps in the appendix).
Enter your account ID that begins with letters ‘ivpnXXXXXXXX’ or ‘i-XXXX-XXXX-XXXX’ and any password.Only your account ID is used for authentication and is case-sensitive. The password field can be left empty or set to anything if your client software requires a non-blank password. -
Advanced options: Enable
-
TLS cipher: None
-
LZO Compression: No
-
NAT: Enable
-
Firewall Protection: Enable
-
Tls Auth Key: Download and paste the contents of the TLS-auth file.
-
Additional Config:
tls-client tls-cipher TLS-DHE-RSA-WITH-AES-256-CBC-SHA key-direction 1 resolv-retry infinite keepalive 10 60 nobind persist-key persist-tun persist-remote-ip verb 3 -
CA Cert: Download and paste the contents of the CA cert file.
-
Click the
Savebutton, then click theApply Settingsbutton.
DNS
-
Navigate to
Setup>Basic Setup. -
Specify one of the following DNS servers in the
Static DNS 1field:- 10.0.254.1 = redular DNS with no blocking
- 10.0.254.2 = standard AntiTracker to block advertising and malware domains
- 10.0.254.3 = AntiTracker Hardcore Mode to also block Google and Facebook
..and 198.245.51.147 in the
Static DNS 2field. -
Click
Save&Apply Settings.
Final steps
-
Reboot your router and wait for a minute or two for everything to settle, then reboot your computer system and check the status of the OpenVPN client in the
Status>OpenVPNarea. -
Check the assigned public IP address on our website and run a leak test at https://www.dnsleaktest.com from one of the devices connected to your DD-WRT router.
Please note: If you plan to use a Multi-hop setup please see this guide and replace the port number in Step 4 with the chosen Exit-hop server Multi-hop port.
Appendix
If you do not have the User Pass Authentication field in your DD-WRT version please follow the steps below:
-
Add the following line to your
Additional Configfield:auth-user-pass /tmp/auth.conf -
Save your configuration by clicking on the
savebutton. -
Click on the
Adminstrationtab and then theCommandstab. Enter the text shown in the box below replacing the username and password in quotes with your account ID (‘ivpnXXXXXXXX’ or ‘i-XXXX-XXXX-XXXX’) and any password. Click onSave startupto continue.#!/bin/sh touch /tmp/auth.conf echo "username" > /tmp/auth.conf echo "password" >> /tmp/auth.conf -
If the previous command worked correctly you should now see the contents above in a new section on the same page called
Startup.