Advanced Privacy and Anonymity Using VMs, VPN’s, Tor – Part 8
Advanced
mirimir (gpg key 0x17C2E43E)
Creating Nested Chains of VPNs and Tor
Introduction
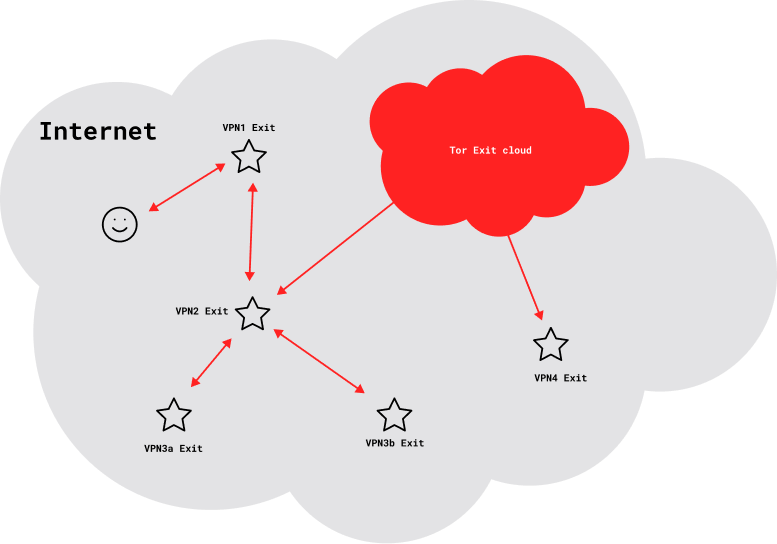
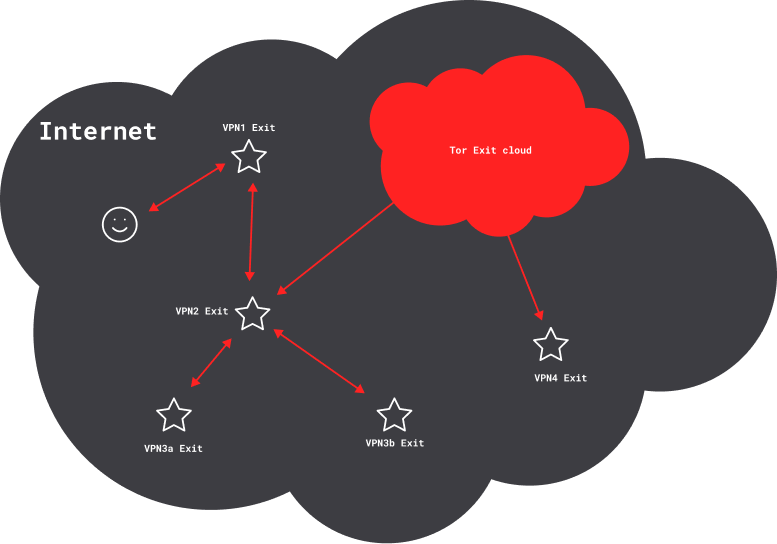
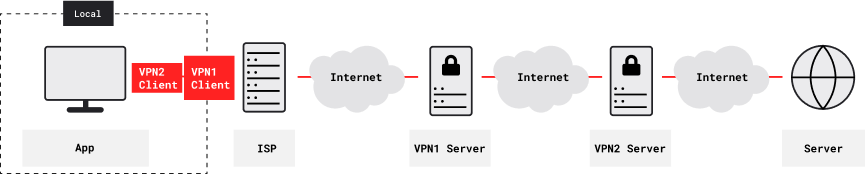
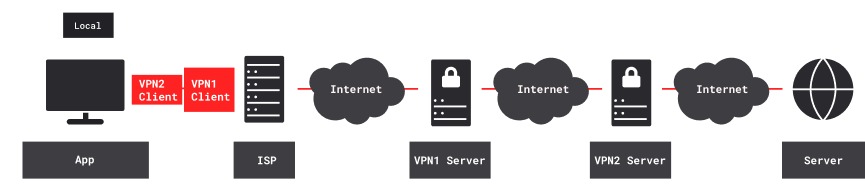
This tutorial covers using multiple pfSense VPN-client VMs and Tor-client VMs to create arbitrarily complex nested and branched chains of VPNs and Tor, such as the setup (reproduced above) suggested in the Planning Initial Setup section of Planning Advanced VM and VPN Setup. Doing that is relatively easy, once you have planned your setup, set up a secure host machine, and created pfSense VMs as clients for multiple anonymously-purchased VPN services, Tor-client VMs (more on that below) and Linux workstation VMs that access the Internet through them. The various VirtualBox VMs that you create are relatively-independent modules. Setting up nested and branched chains of nested VPN tunnels and Tor connections, and workstation VMs that use them, requires little more than changing how these VMs are networked in VirtualBox.
Basic Nested VPN Chains
This section is written for the case where you’re using your direct-connect VPN service in the first pfSense VPN-client VM, and no VPN service on the VM host machine. If you continue using your direct-connect VPN service on the VM host, and use another anonymously-purchased, indirect-connect VPN service in the first pfSense VPN-client VM, you will have a nested chain of two VPNs.
In that case, you can just apply the above difference (one VPN vs two VPNs) to the other diagrams and discussion that follow.
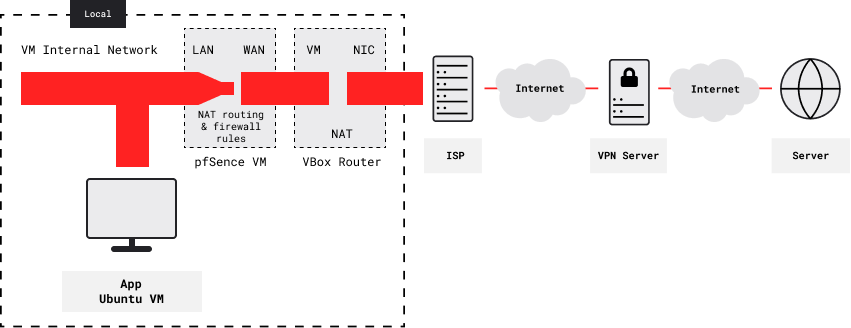
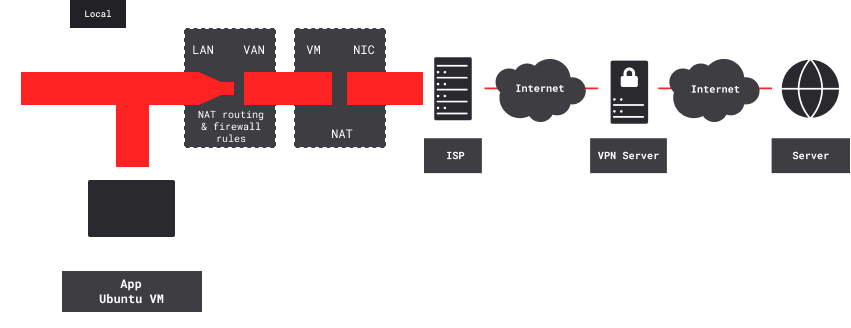
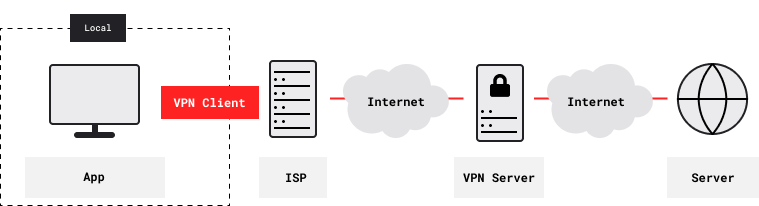
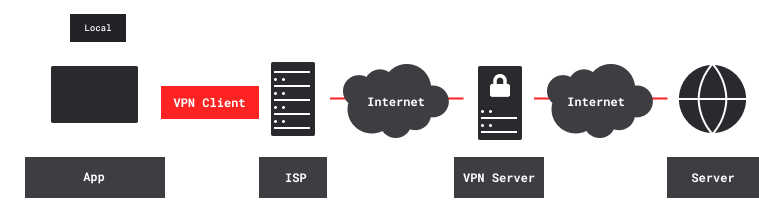
The first pfSense VPN-client VM typically has its WAN adapter NATed to the host via the VirtualBox router, and its LAN adapter attached to a VirtualBox internal network. The pfSense VM runs a DHCP server for that internal network, just as gateway routers typically do for physical LANs. When the OpenVPN client in pfSense establishes a VPN connection, it creates a virtual network adapter (aka tun for tunnel). There are routing and firewall rules that restrict all LAN (and attached VirtualBox internal network) traffic to this VPN tun adapter (instead of WAN) for Internet access, and also block incoming connections, just as gateway routers typically do for physical LANs.
Anything running in workstation VMs attached to this VirtualBox internal network can only access the Internet through the pfSense VM and its VPN tunnel. Applications and VPN networking are isolated in separate VMs (workstation and pfSense VMs, respectively). Exploits that manage to compromise workstation VMs can’t get at VPN networking unless they break out to the host or compromise pfSense. While either is possible, neither is arguably likely, unless you’ve attracted a highly-skilled adversary.
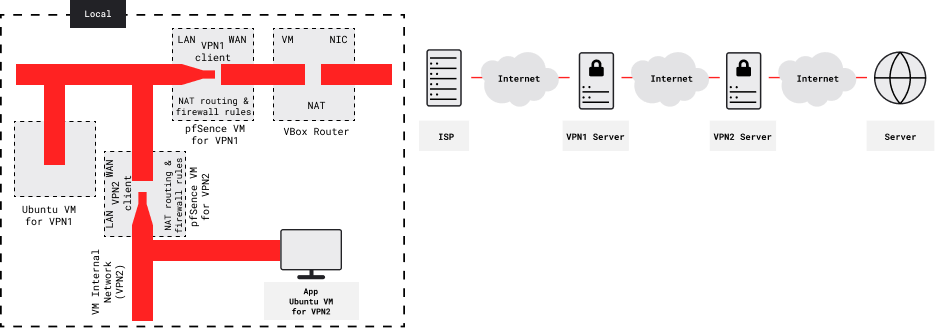
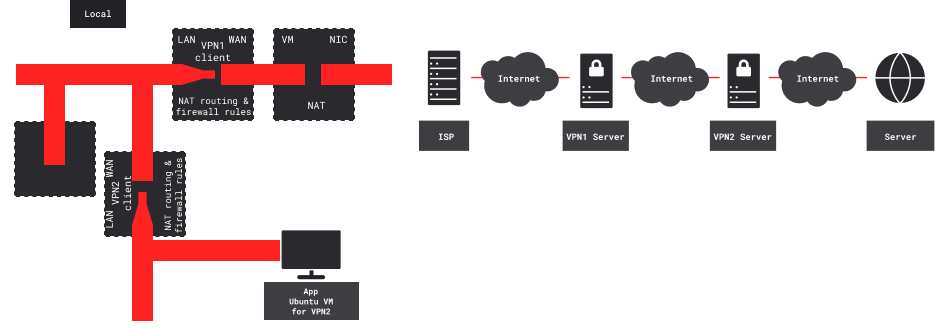
To add another VPN tunnel (VPN2) to the nested chain, you just create another pfSense VPN-client VM, which connects to another anonymously-purchased VPN service. You attach its WAN adapter to the internal network attached to the LAN adapter of the first pfSense VPN-client VM (VPN1). The VPN tunnel from the second pfSense VPN-client VM (VPN2) reaches the Internet through the first pfSense VPN-client VM and its VPN tunnel (VPN1). You attach the LAN adapter of the second pfSense VPN-client VM (VPN2) to another VirtualBox internal network, for which it is the DHCP server. Its VPN tunnel (VPN2) is routed through its LAN adapter to its internal network (and firewalled). Workstation VMs attached to this second VirtualBox internal network access the Internet through the nested VPN chain, as shown above (VPN2 routed through VPN1).
You can add additional VPN tunnels to your nested chain in the same way, either at the end, or further in to create branches. In choosing additional VPN services, there are two key and potentially-conflicting criteria. First, as discussed in the section Using Nested Chains of VPNs and Tor to Distribute Trust of Part 3. Planning Advanced VM and VPN Setup, choosing providers in poorly-cooperating spheres of influence arguably mitigates the risk of joint compromise or subversion.
Second, network latency increases as you add VPNs to the nested chain. As long as you have a broadband Internet connection, and are using VPN services that have fast Internet connections, network latency will be the limiting factor for overall throughput. Even with careful design, latency for nested chains with more than four VPNs will likely make them unusable. Conversely, terminal nodes in branched VPN chains don’t compete very much with each other for bandwidth, unless you push it too far and saturate the shared proximal VPN tunnel.
Also, in chaining multiple pfSense VPN-client VMs, it’s crucial that adjacent pfSense VMs have different LAN IP address ranges. Otherwise, no traffic will flow, because pfSense is a NAT router, not a switch. The simplest approach is using 192.168.1.0/24 for the first pfSense VPN-client VM, 192.168.2.0/24 for the second, 192.168.3.0/24 for the third, and so on. It’s true that routing local resources through VirtualBox internal networks with distinct IP ranges would be difficult, but that’s less important than ensuring security through full isolation.
First review the Creating pfSense VM and Configuring VPN Client section of Part 6. Creating pfSense VMs as VPN Clients. As described, you start by creating the new pfSense VM, installing pfSense, and configuring em0 as the WAN interface and em1 as the LAN interface. However, after pfSense finishes rebooting, and before configuring and setting up a VPN client, you need to change pfSense’s LAN IP address range.
In the pfSense console window (not the webGUI), start by typing 2 in order to Set interface(s) IP address and hit enter. Then type 2 for LAN, and hit enter. Now type the new LAN IPv4 address (e.g., 192.168.2.1) and hit enter. Type 24 as the subnet bit count, and hit enter. Answer y for Do you want to enable the DHCP server on LAN?, and hit enter. Type the start address (e.g., 192.168.2.100) and hit enter. Then type the end address (e.g., 192.168.2.199) and hit enter. Answer n for Do you want to revert to HTTP as the webConfigurator protocol? and hit enter. Finally, reboot pfSense by typing 5, hitting enter, typing y, and hitting enter. Finally, configure a LiveCD VM to access the new pfSense’s webGUI, and use it to finish configuring the new pfSense VM with a client for your new VPN service, as described in Part 6.
In bringing up a nested VPN chain, you must start with the direct-connect VPN client, because it provides Internet connectivity for the rest of the VPN clients. After the direct-connect VPN has connected, start the pfSense client for the VPN that connects through it, and wait for it to finish booting. For pfSense VPN clients, you’ll see an IP address to the right of ovpnc1 if the VPN connection has been established. If you don’t see that, you can hit return once or twice to refresh the display. Once each pfSense VPN-client VM has connected, start the next one, and so on.
Once all of the pfSense VPN-client VMs are up, you can start whatever workstation VMs that will connect through them. If any of the pfSense VPN-client VMs are not connecting properly, you can use your Linux LiveCD VM to login to its webGUI and figure out what’s broken, as described in Part 6. Generally, you can leave all of the pfSense VMs running while you’re working/playing, and even whatever associated workstation VMs you’ll be using. However, it may be prudent (depending on your risk model) to shut down all VMs and the host machine when you’re done (and thereby deny access by adversaries to unencrypted data).
Nested VPN chains occasionally stop working, especially on weekends (when maintenance is typically scheduled). First try restarting each of the VPN clients in order, from direct to increasingly indirect. If you find that one of the VPNs isn’t connecting, review its connection log for errors. There may be interactions among VPN connections. For example, if the DNS server used by a VPN client dies or gets overloaded, VPN(s) tunneled through that VPN won’t connect if you’ve specified servers by hostname, rather than by IP address (because DNS lookups will fail ). You may need to switch servers and/or ports for one of your VPNs.
Tor Gateway VMs
There are two easy ways to add Tor connections to nested chains. One is ra’s Tor gateway VM. It’s an OpenWRT-based router VM that provides Tor connections using transproxy, and it’s very easy to network with pfSense VPN-client VMs. The other is Whonix. It’s an integrated pair of Debian-based VMs, comprising a gateway and a workstation. The Whonix gateway VM isn’t a router, however, so networking with pfSense VPN-client VMs is nontrivial. But it’s easy to run VPN clients in the Whonix workstation. And by the way, in case you’re wondering, it’s probably unworkable to route Tor through a VPN that’s routed through Tor.
Whonix
Using Whonix is covered in the MultiBit Clients in Whonix section of Part 7. Paying Anonymously with Cash and Bitcoins. Start by downloading Whonix-Gateway and Whonix-Workstation to your host machine, via your current best VPN chain. It’s best to verify the downloads as instructed using the OpenPGP signatures and the Whonix signing key. If you can’t be bothered with that, at least download them using BitTorrent (which is more secure, as explained).
Then import both of the Whonix VMs, using File / Import Appliance in VirtualBox (reinitializing MAC addresses). If you’ll be using multiple Whonix instances, each Whonix gateway and workstation VM must have a unique name (which determines the name of its folder). It’s good practice to edit the names of both Whonix VMs right after importing them, adding a unique suffix (or whatever) to distinguish them from others that you may import later.
Before running a Whonix gateway VM, it’s crucial to change its first (WAN) adapter from NAT to a VirtualBox internal network sourced by one of your pfSense VPN-gateway VMs, using the Network tab in the VirtualBox GUI. Otherwise, the Whonix gateway would reveal to your ISP that you’re using Tor. It would also provide your ISP-assigned IP address to Tor’s directory authorities, and as well to the entry guards that it chooses. Also, each Whonix gateway VM must have a uniquely-named internal network attached to its second (LAN) adapter. In order for the workstation VM to connect via the gateway VM, the workstation VM’s network adapter and the gateway VM’s second (LAN) adapter must share a uniquely named internal network. It’s helpful to name the gateway VM, workstation VM and internal network for each Whonix instance in a logical and memorable way, to avoid confusion and mistakes.
Adding Whonix instances to VPN chains is trivial. Using the VirtualBox GUI, edit the first (WAN) adapter in the Whonix gateway VM, and specify the internal network sourced by the desired pfSense VPN-gateway VM. In order to further isolate multiple Whonix instances from each other, you may want the gateway VMs to connect at different points in your nested VPN chain. That reduces the chance that adversaries controlling parts of the Tor network will associate the two Whonix instances.
Installing VPN clients in Whonix workstation VMs is also trivial, as described in the Setting Up VPN on Linux Workstation VM section of Part 2. Basic Setup Using VMs, VPNs and Tor. Whonix workstations are based on Debian, customized to securely use Tor. However, given that Tor only routes TCP traffic, the Network Manager settings are different. In the General tab of the Advanced window, check Use a TCP connection and Use custom gateway port, and specify the appropriate TCP port number from your VPN provider. It’s crucial to use a VPN service that’s not associated with you. See Part 7. Paying Anonymously with Cash and Bitcoins.
As everything else does, VPN connections will probably take longer to establish through Tor. Also, given that all applications in the Whonix workstation VM are configured to use Tor through the gateway VM, you’ll need to modify their preferences in order to connect through the VPN tunnel. In Firefox, for example, you navigate Edit / Properties / Advanced / Network / Connection..Settings, and select No proxy. And you’ll need to reverse the change if you later want to browse through Tor without the VPN connected.
OpenWRT Tor gateway
To use ra’s OpenWRT Tor gateway VM, first download the latest version, currently Tor gateway 0.6.3.ova. Import it using File / Import Appliance in VirtualBox (reinitializing MAC addresses). As with the Whonix gateway VM, edit its first (WAN) adapter from NAT to a internal network sourced by one of your pfSense VPN-gateway VMs, and uniquely rename the internal network attached to its second (LAN) adapter. That’s it.
Because ra’s Tor gateway VM is (like pfSense) a router running a DHCP server, you can attach any workstation VM to the internal network attached to its second (LAN) adapter, and so reach the Internet through Tor. As with the Whonix workstation, workstation VMs can only reach the Internet through the Tor gateway, so there’s negligible risk that improperly configured applications will bypass Tor. However, given that Tor only routes TCP traffic, applications that depend on UDP traffic will not work properly. Also, browsing with stock Firefox is far less anonymous than with the Tor-optimized version in the Tor Browser Bundle, Tails and Whonix.
You can also attach a pfSense VPN-gateway VM to the internal network attached to the Tor gateway’s second (LAN) adapter. As with the OpenVPN client in the Whonix workstation VM, you’ll need to configure the pfSense OpenVPN client with the proper server address and port number for connecting in TCP mode. See Part 6. Creating pfSense VMs as VPN Clients. As with the OpenVPN client in the Whonix workstation VM, the OpenVPN client in pfSense will probably take longer to connect through Tor. As noted above, it’s crucial to use a VPN service that’s not associated with you.
When routed through Tor, pfSense VMs can’t resolve hostnames to IP addresses. That prevents pfSense from getting the correct time from <0.pfsense.pool.ntp.org>. However, given that the Tor exit IP address changes frequently, it is unwise to specify specific NTP servers by their IP addresses, because that would reduce anonymity.
Testing and Optimization
The various VirtualBox VMs that you create – pfSense VPN-client, OpenWRT Tor gateway, Linux workstation and LiveCD, and Whonix VMs – are relatively-independent modules. Setting up arbitrarily complex nested and branched chains of nested VPN tunnels and Tor connections, and workspaces that access the Internet through them, requires little more than changing how they’re networked in VirtualBox. However, creating setups that are usable and reliable requires testing and optimization. With complex setups, that can be quite challenging, because there are so many different ways to fail.
It’s best to start with a simple setup. Once it’s usable and reliable, you’ll have a reliable core that you can build on, and you will also have acquired requisite experience and skills. For the setup suggested in the section Planning Initial Setup of Planning Advanced VM and VPN Setup, which is pictured at the top of this page, it’s best to start with just two VPNs: VPN1 and VPN2. If you’re running the direct-connect VPN (VPN1) in the host machine, start with just one pfSense VPN-client VM (VPN2).
To provide context for testing your nested VPN chain(s), periodically check the latency (ping) and speed of your native ISP connection at Speedtest and Fast. If at all possible, don’t use your VM host machine for that. Also, avoid checking your ISP connection while actively testing nested VPN chain(s), because that would associate their IP addresses in Speedtest’s logs. For the same reason, don’t check multiple VPN-chain nodes simultaneously. Wait at least several minutes between tests from different IP addresses.
If you’re running the direct-connect VPN in the host machine, and have gotten this far, it’s probably working well enough. If there are connection problems, review the Network Manager connection log, as described in the section Viewing Network Manager OpenVPN Logs of Part 4. Setting Up Secure Host Machines. You’ll need a Linux LiveCD VM for testing each VPN that you’re running in a pfSense VM, which you attach to that pfSense VM’s internal network. I recommend using multiple LiveCD VMs here for two reasons: 1) to avoid leaking VPN account information from pfSense to workspace VMs; and 2) to limit access to pfSense from potentially-compromised workspace VMs. If you have added verb 5 in the Advanced box in OpenVPN client setup at VPN: OpenVPN: Client, a detailed connection log is available at Status: System logs: OpenVPN.
To optimize your nested VPN chain, start with the direct-connect VPN, and work methodically through the rest of the VPNs. For each VPN connection in the chain, check latency (ping) and speed at Speedtest. If you can’t connect, review the connection log at Status: System logs: OpenVPN in the pfSense webGUI (or Network Manager OpenVPN Logs, on the host machine) for errors. It’s normal for latency (ping) to increase as you add more VPNs to the nested chain. That primarily reflects additional processing delay in networking hardware, and not simply longer path length. Although speed typically decreases as you add more VPNs, due to both increased latency and network throttling, you may occasionally see it increase. As noted, wait at least several minutes between tests from different IP addresses. Once you’re satisfied with each VPN connection, repeat the process with the next one in the nested chain.
If you have a typical broadband Internet connection, reasonable targets for VPN1, VPN2 and VPN3 are as follows:
| VPN Level | Latency (msec) | Speed (Mbps) |
|---|---|---|
| VPN1 | 150-200 | 5-10 |
| VPN2 | 200-250 | 2-5 |
| VPN3 | 250-350 | 1-3 |
If you’re seeing lower speeds, especially for downloading, try using different VPN servers, different port numbers, TCP mode vs UDP mode, etc. Some ISPs throttle traffic on nonstandard ports. Also, in order to meet your design goals, as discussed in section Using Nested Chains of VPNs and Tor to Distribute Trust of Part 3: Planning Advanced VM and VPN Setup, it may be necessary to accept slower connections.
If nothing seems to help, get support as anonymously as possible. Anonymity is especially important for your indirect-connect VPNs. Seek support while connecting through the VPN that the problematic VPN connects through. It’s best to use online forums that support HTTPS. Start with your provider’s support forum. You can also post in the privacy problems section of Wilders Security Forums. If you must submit a support ticket to the VPN provider, be sure to use an anonymous email address. And keep in mind that support tickets typically generate unencrypted replies, which may quote the support request.
Leak Testing with Wireshark
The section Installing and Checking VPN-Firewall in Part 4. Setting Up Secure Host Machines explains how to test the host machine’s VPN connection and firewall setup using Wireshark. The section Leak Testing with Wireshark in Part 6. Creating pfSense VMs as VPN Clients does the same for the first pfSense VPN-client VM (in that case, running an indirect-connect VPN). It’s crucial to verify that no traffic bypasses the VPN tunnel, even after the VPN connection is killed.
You can apply the same approach to each of the gateway VMs (pfSense VPN-client, Whonix Tor-gateway or OpenWRT Tor-gateway) in a nested chain. Using Wireshark instances, you capture traffic at three points:
- eth0 adapter of a workstation VM that accesses the Internet through the gateway VM being tested
- WAN adapter of the gateway VM being tested
- LAN adapter of the gateway VM through which the gateway VM being tested connects
The first capture shows you what Internet sites the workstation is accessing (or trying to access). The second and third captures show you what traffic is leaving the gateway VM for the Internet. They should be identical, and it’s only necessary to use one of them, if the other is hard to get at (e.g., the WAN adapter on an OpenWRT Tor-gateway VM). When the gateway VM is working properly, the second and third captures should show only local IPs and the servers (OpenVPN or Tor) that the gateway is using, and they should not show any of the remote IPs seen in the first capture.
When the gateway VM is broken, the second and third captures should show only local IPs and reconnection attempts from servers that the gateway was using. They should definitely not show any of the remote IPs seen in the first capture. If the second or third captures show any of the remote IPs seen in the first capture, whether the gateway VM is functional or not, there are leaks that must be fixed.
There are instructions for killing the openvpn process in the sections of Part 4 (for the host machine) and Part 6 (for pfSense) cited above. Basically, you run killall openvpn at a command prompt. To re-establish the VPN, use Network Manager in the host machine, and just restart the pfSense VM. To kill the tor process in the OpenWRT Tor-gateway VM, you run killall tor at the command prompt. For the Whonix Tor-gateway VM, it’s sudo killall tor. To restart Tor, it’s best to just reboot the gateway VM.
Here to learn?
Consult our guides for increasing your privacy and anonymity.
IVPN Privacy GuidesSuggest an edit on GitHub.