Advanced Privacy and Anonymity Using VMs, VPN’s, Tor – Part 3
Advanced
mirimir (gpg key 0x17C2E43E)
Planning Advanced VM and VPN Setup
Introduction
This guide introduces an advanced setup (implemented in Parts 4-8) which provides vastly greater privacy, anonymity and freedom than the basic setup presented in Part 2. Basic Setup Using VMs, VPNs and Tor. It employs compartmentalization (aka compartmentation) and isolation, by using multiple virtual machines (VMs) with Internet access through arbitrarily complex nested and branched chains of VPNs and Tor. The full setup will require at least a few days of focused work. Please review Part 1. Introduction and consider your threat model before choosing which aspects to implement.
This advanced setup broadly resembles the basic setup presented in Part 2. The host machine reaches the Internet through a VPN service, with firewall rules to prevent leaks. There are multiple Linux workspace VMs to compartmentalize and isolate activity, and the various workspace VMs independently reach the Internet through VPN services or the Tor network. It’s easy to deter profiling and tracking by using multiple pseudonyms in multiple workspace VMs, with different Internet IP addresses. Impacts of malware and hacking are limited, as long as the VMs networking services and VPN client are not compromised or circumvented.
However, the advanced setup goes far beyond the basic setup in a few key ways. Rather than using an existing and potentially compromised system (typically Windows or OS X) as VM host, this setup uses a fresh Linux installation. Because Linux is open-source, there is also less risk of backdoors. Furthermore, because most Linux distributions are free, there is no money trail that might link you to a product key, or other unique information in the installation.
In the basic setup, the Linux workspace VMs (except Whonix) contain both applications and networking services (routing, firewall, VPN client, etc). By exploiting vulnerabilities in applications and users, attacks may readily compromise or circumvent the VPN client, and then deanonymize users by contacting a monitoring server directly, rather than through the VPN tunnel. Attacks may also install malware that deanonymizes by calling home when the VPN is not connected. Indeed, any document that automatically loads remote resources, such as this logo, can do the same.
![]()
In this advanced setup, all workspaces and networking services (VPN and Tor clients) are isolated in separate workspace and gateway VMs (pfSense VPN-client VMs and Tor-client VMs). Attacks that exploit vulnerabilities in applications and users can’t reach networking services unless they can also compromise or circumvent VM-host barriers. And because workspace VMs can only reach the Internet through their gateway VMs, there’s no access to remote resources when the gateway is down or broken, except through deliberate user error.
Furthermore, in this setup, the arrangement of gateway VMs and VirtualBox internal networks transparently creates layers of encrypted routing instructions, which then direct packets through specified chains of VPN servers and Tor entry relays. That is, packet routing through the Internet reflects local routing of gateway VMs in VirtualBox. Using the VirtualBox GUI, it’s trivial to create and modify arbitrarily complex nested and branched chains of VPN and Tor connections. It’s also possible, using the VBoxManage command-line interface, to automate changes in routing topology (not included in these guides).
Indeed, this is a simple (and static) implementation of onion routing:
Onion routing is a technique for anonymous communication over a computer network. Messages are repeatedly encrypted and then sent through several network nodes called onion routers. Like someone peeling an onion, each onion router removes a layer of encryption to uncover routing instructions, and sends the message to the next router where this is repeated. This prevents these intermediary nodes from knowing the origin, destination, and contents of the message.
Initial Privacy Considerations
If you’re, for example, a political dissident who might suffer serious consequences if compromised, it would be prudent to read these guides, and download required software, using a secure VPN service. Otherwise, your ISP and other local observers can see what you’re doing, and you might be flagged for increased scrutiny. Ideally, local observers should see only that you’re using a VPN service, and nothing else. If you’ll be chaining multiple VPNs, as described below, it’s best to pick one now that you will connect to directly. Consistently using just one direct-connect VPN service arguably attracts less attention than using many VPN services and Tor.
If you’re currently using a VPN service, adopting it as your direct-connect VPN would be best, as long as it’s privacy-friendly and its performance is adequate. Unbiased sources for information about VPN services include discussions at Wilders Security Forums (which uses a self-signed certificate) and annual reviews at TorrentFreak. Connecting indirectly to your current VPN service through a new direct-connect VPN would arguably be pointless, because there are potentially records associating your account there with your ISP-assigned IP address.
If you’re not currently using a VPN service, now is a good time to pick one that you’ll be connecting to directly. For direct-connect VPNs, the key features are speed (high bandwidth and low latency), uncapped usage (throughput) and mainstream popularity (so you stand out less). You’ll typically be using just one direct VPN connection, and so it’s arguably better to reserve services that permit multiple simultaneous connections, and have exit servers in many countries, for use as indirect VPNs (which you will access through your direct-connect VPN).
Unless you’re already using a VPN service and/or Tor, install your chosen direct-connect VPN client on the machine that you’re reading this on, following the provider’s instructions. Also download all required software on this machine, so your ISP etc can’t see what you’re doing.
At the cost of increased complexity, by choosing the high-privacy option in the next tutorial (Part 4. Setting Up Secure Host Machines), you can hide all evidence of your new setup from your ISP and other local observers. They’ll just see downloading through your direct-connect VPN service.
Using Nested Chains of VPNs and Tor to Distribute Trust
It’s crucial to keep in mind that, by using VPN services, we are merely choosing to trust our VPN providers, instead of our ISPs and governments. We can choose VPN providers that use multiple hops, promise not to keep logs, carefully segregate our account data and their VPN servers, and even claim that they will move or shut down before compromising our privacy. But there is no reliable way to know whether our trust has been warranted, unless we discover that it hasn’t.
If privacy and pseudonymity really matter to us, therefore, it’s not prudent to rely merely on a single VPN provider. Instead, we can distribute our trust by routing one VPN tunnel through another, from a different provider. More generally, we can create nested chains of VPN tunnels from multiple providers. In order to compromise our privacy, an adversary would need to compromise or subvert most (if not all) of the VPN services in our chain(s).
This approach is vulnerable in at least two ways. First, there may be money trails to inner (in a topological sense) VPN services that we access indirectly through other VPN services. Using free VPN services is an option, but they typically cap bandwidth and throughput. The best option is paying with cash by anonymous snail mail. Another option is paying with Bitcoins that have been thoroughly anonymized using multiple anonymous accounts and mixing services.
Second, some (or all) of the VPN services in our chain(s) may be vulnerable to compromise or subversion by broadly resourceful adversaries. To mitigate this risk, it’s prudent to choose providers that operate from poorly-cooperating geopolitical spheres of influence (SOIs). It’s best to avoid providers in the SOI where you live. For your direct-connect VPN, it’s arguably best to choose a provider in a relatively-neutral SOI, which doesn’t attract too much attention, and yet is at least somewhat hard to subvert. For your terminal/innermost VPN, it’s arguably best to choose a provider in an effectively non-cooperating SOI. If you’re using three or more VPNs overall, it’s arguably best to alternate between distinct poorly-cooperating SOIs for the middle VPNs.
We can also rely on Tor, a highly sophisticated implementation of onion routing, where trust by design is distributed among numerous participants with disparate goals. It provides far greater anonymity than VPNs (even complex nested chains of VPNs) could ever manage. However, configuring applications to use Tor properly (with no leaks) is nontrivial, and it’s best to use packaged setups.
The Tor Browser Bundle comprises Tor and the Tor Project’s version of Firefox, which is optimized for anonymity. Although it’s very easy to install and use, it’s vulnerable to malware exploits and leaks from applications misconfigured by users. The Amnesic Incognito Live System (Tails) is a LiveCD (read-only by default) which can also be run as a VM. It’s preconfigured with many applications. But it’s still vulnerable to malware exploits that circumvent Tor. Both Whonix and Incognito isolate workspace and networking services in separate gateway and workstation VMs. That protects against deanonymization through user error, misconfigured applications or malware exploits.
It’s best to incorporate Tor at or near the end of nested VPN chains. VPN services are popular for P2P file sharing, and using them arguably attracts less unwanted attention than using Tor, except where file sharing and dissent are both forbidden. Indeed, access to the Tor network is blocked in some places. One can circumvent blocks by connecting through bridge relays. However, as bridge relays are identified and blocked, users must switch to new ones. Given the trial and error process of using bridge relays, they do not reliably hide Tor use. It would be safest to use both VPNs and obfuscated bridges, which obfuscate Tor traffic patterns.
Some Internet sites don’t accept connections from Tor exit relays. Some sites block all Tor exits, while others block only those that appear on various blacklists. A simple solution is routing a VPN service through Tor. Tor can carry only TCP traffic, so one must use TCP mode for the VPN connection. But the resulting VPN tunnel carries both TCP and UDP traffic, increasing application compatibility and reducing the chance of leaks.
Preventing VPN Leaks
VPN connections are prone to (at least) two types of leaks. One type involves DNS servers. Normally, after a VPN client requests a connection, the server configures the tunnel, and pushes required information to the client. Included are changes in network routing, so all Internet traffic uses the VPN tunnel, and DNS servers to be queried for translating hostnames to IP addresses.
But if something goes wrong, the client machine may instead query DNS servers provided by the user’s ISP. And that may reveal the ISP’s identity to those observing the VPN exit server. It may also reveal to the ISP what domains are being accessed. If the user’s ISP can see both user traffic to the VPN entry server and queries to its DNS servers, timing analysis could readily reveal what domains the user is accessing. In other words, the VPN would be compromised for that user.
Preventing such DNS leaks may be nontrivial. It may require temporarily hard coding the VPN’s DNS servers in the client machine’s network configuration, and undoing that after the VPN connection is closed. That’s what the VPN client should be doing, by the way, but sometimes it doesn’t work, especially with uncommon operating systems that the VPN configuration doesn’t fully support.
The other type of leak involves traffic bypassing the VPN tunnel to reach the Internet directly. The operating system may not properly implement changes in network routing pushed by the VPN server to direct all Internet traffic through the VPN tunnel. Or the VPN connection may fail in some way. For example, VPN servers may go offline, or VPN client software may hang or die, perhaps after intermittent network outages. Whatever the cause, it’s crucial that there be no Internet connectivity except through the VPN tunnel, even if the VPN connection is improperly configured, or fails in any way.
Unfortunately, OpenVPN was designed to provide secure connectivity to remote networks, but not Internet anonymity. Indeed, Internet traffic exits locally by default in OpenVPN, in order to conserve VPN bandwidth. While it’s easy to configure VPN tunnels to carry all network traffic, it’s difficult to prevent traffic from using the client machine’s physical adapter after the VPN client software terminates. By default, all changes to network routing made during VPN connection are reversed when the VPN disconnects. That’s generally a good thing, because users might otherwise be left without Internet access (even to reconnect the VPN).
Some VPN providers use proprietary clients that reportedly fail closed. But generally, the only reliable protections are network routing and firewall rules that restrict network connectivity to the VPN tunnel. In Windows and OS X, you can use, respectively, Comodo and PF. In Linux, you can use VPN-Firewall. It’s a bash script that creates iptables rules which block all Internet connections except through the designated OpenVPN server, and yet permit transparent VPN reconnection. It’s part of the high-privacy option in the next tutorial, Part 4. Setting Up Secure Host Machines. Whatever method you use, it’s prudent to test for leaks. That’s also covered in the next tutorial.
Using pfSense VMs as VPN Clients
Advanced networking expertise is required to securely route one VPN tunnel through another, with no leaks, on an individual machine. However, doing that is trivial by networking virtual machines (VMs) that serve as gateway routers. Indeed, it’s possible to create arbitrarily complex nested and branched chains of VPNs (and Tor).
pfSense, a hardened router/firewall operating system based on FreeBSD and its stateful packet filter PF, is an excellent choice for VPN-client VMs. pfSense VMs are small and resource-light. Creating VPN connections and preventing leaks is very easy in pfSense. The pfSense WebGUI is highly intuitive, and yet exposes virtually all pfSense capabilities. Using pfSense VMs as VPN clients is covered in Part 6. Creating pfSense VMs as VPN Clients.
Visualizing Nested VPN Tunnels
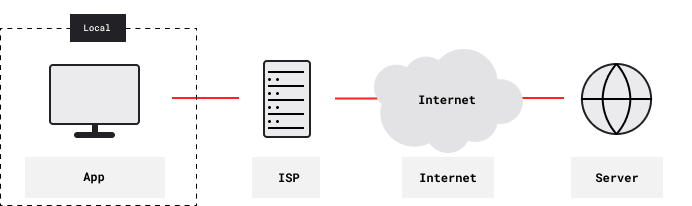
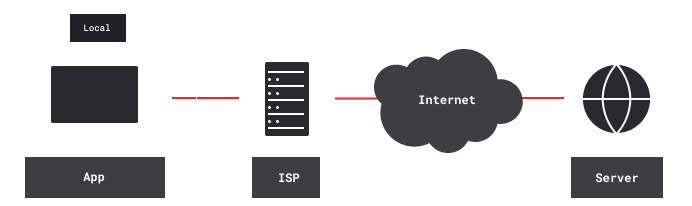
Chains of nested VPN tunnels provide better privacy and anonymity for accessing content servers, Tor entry relays, peers of P2P networks (such as BitTorrent, Freenet and I2P) and other remote servers. With no VPN, remote servers see your ISP-assigned IP address. Also, your ISP and other local observers see the IP addresses of remote servers. And unless connections are end-to-end encrypted, they can eavesdrop and carry out man-in-the-middle (MITM) attacks.
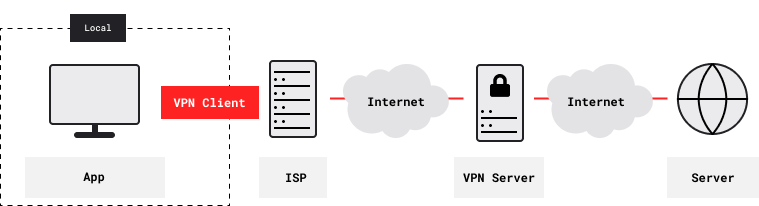
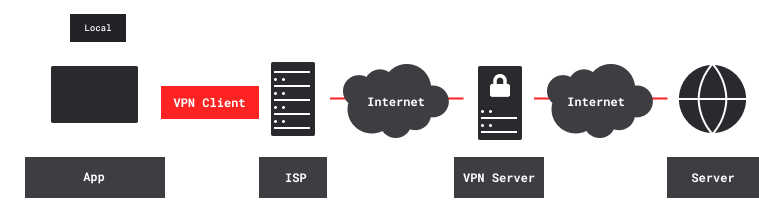
With one VPN, remote content servers instead see the VPN’s exit IP address. Your ISP and other local observers see the VPN’s entry IP address, and the VPN tunnel is encrypted. However, the VPN provider knows both your ISP-assigned IP address and the IP addresses of remote servers.
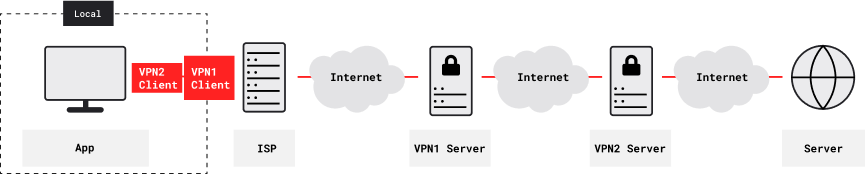
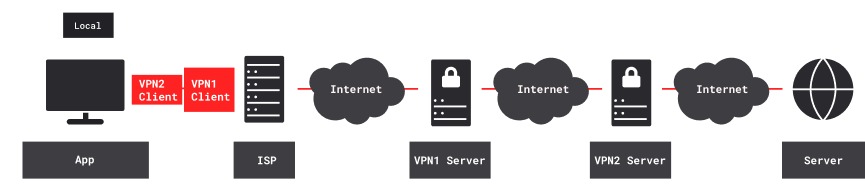
With two nested VPNs, remote content servers see the second (inner) VPN’s exit IP address. Your ISP and other local observers see the first (outer) VPN’s entry IP address. Both VPN tunnels are encrypted. Neither VPN provider knows both your ISP-assigned IP address and the IP addresses of remote servers. The first (outer) VPN provider knows your ISP-assigned IP address, and also the second (inner) VPN’s entry IP address. The second (inner) VPN provider knows the IP addresses of remote content servers, and also the first (outer) VPN’s exit IP address.
With three or more nested VPNs, information about your Internet activity would be further fragmented, and harder to compromise. However, as VPN tunnels are nested more deeply, two factors limit usability. First, each VPN level adds 50-100 ms latency, and may also restrict bandwidth. Second, overall reliability (being the product of the individual VPN reliabilities) is lower.
Planning Initial Setup
You might want to start by creating a setup such as this.
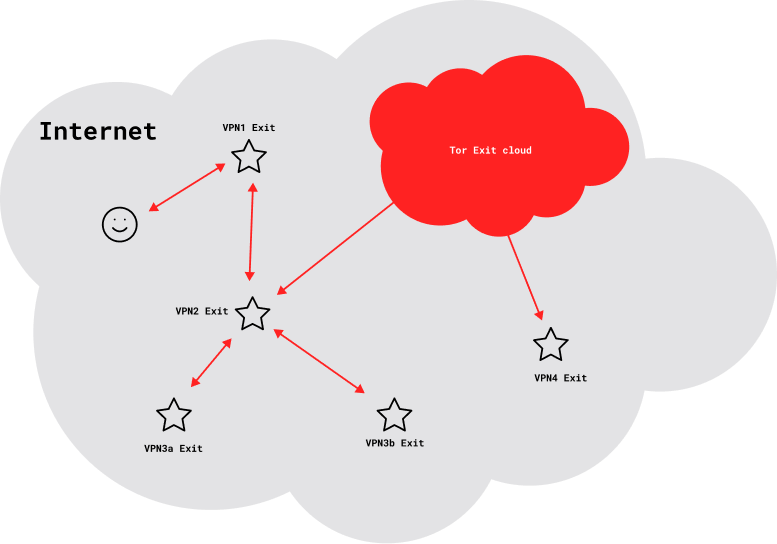
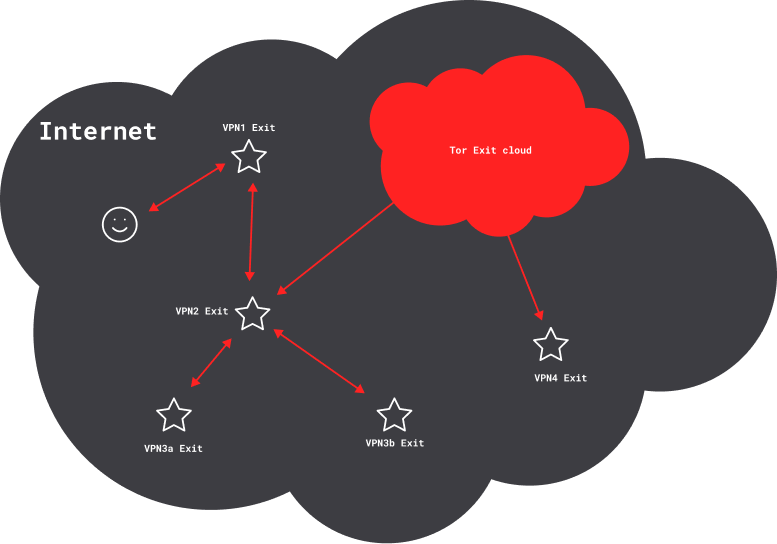
Each star denotes a VPN exit, with an invariant IP address that’s shared by all users. Two VPN services (VPN1 and VPN2) form the backbone. A third VPN service, routed through VPN2, provides multiple simultaneous exits (VPN3a and VPN3b). A Tor client, also routed through VPN2, provides Internet access through a cloud of frequently changing exit IP addresses that are shared by many other users. Finally, a fourth VPN service (VPN4) is routed through the Tor connection.
Each VPN tunnel in a nested chain provides some degree of separation and anonymity. How much depends on such factors as the number of concurrent users, what the service logs, and the availability of any logs to adversaries. But generally, your risk of association is greatest with the VPN1 exit, less with the VPN2 exit, and even less with the VPN3a and VPN3b exits. Tor connections arguably provide far more separation and anonymity, so your risk of association through the Tor exit cloud is far less than through the VPN3 exits.
Routing VPN4 through the Tor connection, however, weakens anonymity. That’s obviously so if there are email or money trails from you to VPN4. But even free VPN services, with no such linkages, weaken Tor anonymity. Tor clients plan and test numerous circuits, with diverse paths and exit relays. They normally use multiple concurrent circuits to isolate application data streams, and they change circuits frequently. But once a VPN tunnel is established using a particular circuit, the Tor client can’t move it to a new circuit, until the VPN disconnects and reconnects. Even so, the VPN4 exit is still potentially far less associated with the VPN2 exit than the VPN2 exit is with you.
Everyone using a given VPN exit server has the same IP address. That’s good, because crowding increases anonymity. However, using a particular VPN exit for multiple pseudonyms is somewhat counterproductive, given the shared IP address. It’s best, therefore, to use just one primary pseudonym with each pfSense VPN-client VM, and its corresponding VPN exit and position in the overall nested VPN chain.
It’s also best for each pseudonym to consistently use a particular VPN exit. Changes in IP address can trigger account-verification requirements by some providers, such as Facebook and Google, and may even lead to blacklisting. That’s hard to avoid with Tor, because clients use multiple concurrent circuits (including exit relays) to isolate application data streams, and they change circuits frequently. VPNs can be routed through Tor, but that decreases anonymity.
In creating and using these setups, it’s crucial to keep in mind that associations among you and the various elements – exit IP addresses, and the pseudonyms and workstations that use them – can never be decreased, but only increased. For example, consider VPN4 that’s been routed through Tor. If you use that connection with a pseudonym or workstation that’s more closely associated with you, it’s prudent to assume that the association persists. Or consider a pseudonym created using VPN4. Using that pseudonym without Tor, even through nested VPNs, permanently associates it more closely with you.
Multiple pseudonyms should never share a workstation VM, given the risk of cross-correlation through routine tracking, malware and active attacks. It’s also prudent to compartmentalize information for a given pseudonym among multiple workstation VMs. One workstation VM might serve for routine online activity. Using a diskless LiveCD VM would provide some protection for visiting questionable websites or opening questionable files (but not as much as a diskless machine booting from a LiveCD). Another workstation VM might host a Bitcoin client, and hold other financial information. Highly sensitive information might be secured in one or more VMs that are routinely offline, and never share LANs with potentially compromised VMs.
In particular, a workstation should not contain information about the VPN account that it’s connecting through. The identity of the VPN service is obvious. Remote servers see VPN exit IP addresses, and may even reveal them in forum posts or email headers. However, account details such as email address and payment method may reveal true identity (or, at least, a weaker pseudonym). Although information about VPN service(s) purchased for extending the nested VPN chain is less sensitive, it’s prudent to segregate it (with other financial information) from routine online activity.
That’s a problematic issue, because configuration and management of pfSense VMs require workstation VMs for accessing the pfSense webGUI. For VPN-client setup, workstation VMs must have VPN credentials, which may be linked to email address and payment method. To reduce the risk of compromise and cross-correlation, it’s best to administer each pfSense VPN-client VM with a dedicated workstation VM, which contains no information about any pseudonyms that connect through that pfSense VM. Alternatively, you can use a diskless LiveCD VM for administering all of your pfSense VMs, and download VPN configuration files when needed.
As discussed in Part 2. Advanced Privacy and Anonymity Using VMs, VPN’s, Tor, WebGL fingerprinting is a serious risk when using VMs for compartmentalization. On a given host, all VMs that use a given graphics driver will have the same WebGL fingerprint, because they all use the same virtual GPU.
It’s best to compartmentalize across VMs with different graphics drivers. Use Debian or Lubuntu, perhaps, but not both (where it matters, anyway). For compartments where separation is crucial, use VMs with different graphics drivers. Possibilities include Arch, Fedora, PCBSD, Windows and Yosemite Zone.
It’s also prudent to disable WebGL in browsers before using them online. Take the VM offline, by changing Adapter 1 to Not attached in VirtualBox Network settings. Then start Firefox in the VM, open about:config, and toggle webgl.disabled to true. Now change Adapter 1 back to NAT (Internal Network, when you’re using pfSense VPN-gateway VMs). You can also install NoScript, and check Forbid WebGL in the Embeddings tab of Options.
Next Articles
- Advanced Privacy and Anonymity Using VMs, VPN’s, Tor – Part 4
- Advanced Privacy and Anonymity Using VMs, VPN’s, Tor – Part 5
- Advanced Privacy and Anonymity Using VMs, VPN’s, Tor – Part 6
Here to learn?
Consult our guides for increasing your privacy and anonymity.
IVPN Privacy GuidesSuggest an edit on GitHub.